

Using Weights and Airlocks in Fermentation
Using Weights and Airlocks in Fermentation (Why They Make Such a Difference)
When I first started fermenting, I thought it was just a matter of packing vegetables into a jar, adding brine, and letting time do the rest.
Sometimes that worked.
Other times, I’d end up with floating vegetables, strange smells, or a batch that just didn’t turn out right. One jar of pickles even forced brine out of the top after pressure built up — not exactly what I was aiming for.
The biggest improvements came when I started using two simple tools properly: weights and airlocks.
They’re not complicated, but they solve the two main problems that cause most fermentation issues. Once I started using them consistently, everything became more predictable — better texture, cleaner flavours, and far fewer failed batches.
Do You Need Weights and Airlocks for Fermentation?
Fermentation weights and airlocks are not essential, but they make the process much more reliable. Weights keep vegetables submerged under the brine, preventing mold and spoilage, while airlocks allow gas to escape without letting oxygen or contaminants in. Using both together helps create a stable environment and leads to more consistent fermentation results.
Why Weights and Airlocks Matter (Where Things Usually Go Wrong)
Most fermentation problems come down to two things:
- Food being exposed to air
- Pressure building up inside the jar
If vegetables float above the brine, they’re exposed to oxygen. That’s when you start seeing mold, yeast growth, or that slightly off smell that tells you something isn’t right.
Weights solve this by keeping everything submerged.
Airlocks deal with the second issue. As fermentation starts, gas builds up inside the jar. Without a way to release it, you either have to keep opening the lid or risk pressure forcing liquid out.
Airlocks let that gas escape while keeping outside air, fruit flies, and contaminants out.
You can ferment without these tools, but in my experience, that’s when small problems start adding up. Once I started using both together, my results became much more consistent.
How Fermentation Weights Work (And When They Matter Most)
Fermentation weights are designed to keep your vegetables fully submerged under the brine.
That might sound like a small detail, but it makes a big difference.
From what I’ve seen, batches go wrong most often when small pieces float to the surface. Even a few exposed bits can lead to mold forming or flavours going off.
Once everything stays properly submerged, the environment becomes much more stable.
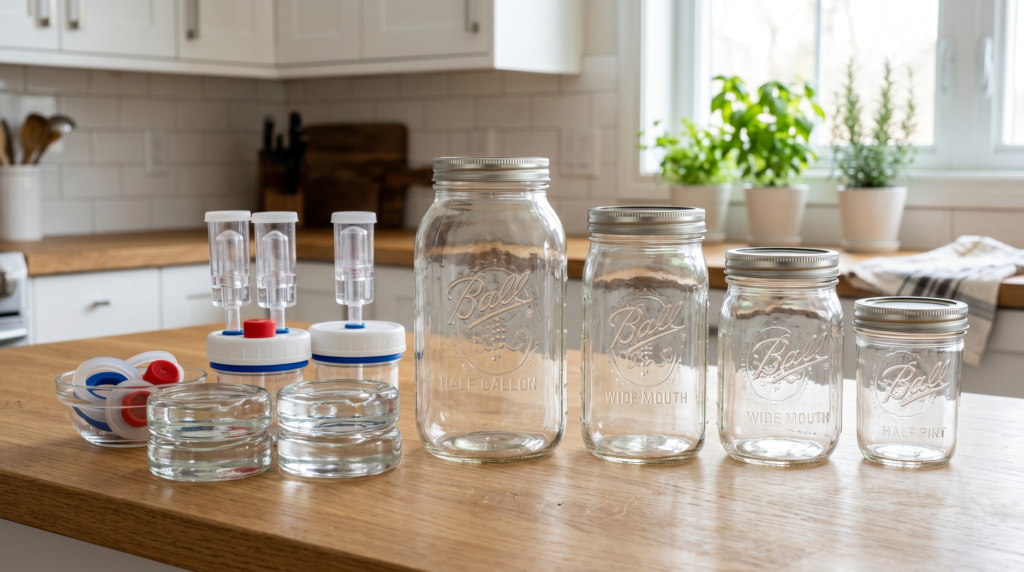
Common Types of Weights
- Glass weights – easy to clean, non-reactive, and you can see what’s happening in the jar
- Ceramic weights – sturdy and reliable, just check for cracks
- Improvised options – small jars, brine-filled bags, or clean stones can work, but results are less consistent
This is the style of glass weight I use. The handle makes it easier to lift out, especially once fermentation gets going and everything is packed in tightly.
I started with improvised setups, but switching to proper weights made things easier and more reliable.
Why Airlocks Make Fermentation Easier
Airlocks are one of those things you don’t realise you need until you use one.
Their job is simple:
let gas out
keep air and contaminants out
When fermentation gets going, carbon dioxide builds up quickly. Without an airlock, you either have to “burp” the jar manually or deal with pressure pushing liquid out.
I’ve had both happen.
With an airlock, it becomes a hands-off process. You’ll often hear a small bubbling sound as gas escapes — that’s a good sign everything is working as it should.
Types of Airlocks
- Water airlocks – the classic bubbling style, great for most ferments
- Silicone lids/valves – simple, low-maintenance, and easy to clean
- DIY setups – can work short-term, but are usually less reliable
These are the airlocks I use and recommend
Once I switched to a proper airlock, I stopped worrying about fruit flies, pressure buildup, or constantly checking jars.
Simple Method: Using Weights and Airlocks Together
Here’s the basic process I use:
- Pack the jar tightly – this reduces air pockets
- Add brine – make sure everything is covered
- Place the weight – push all solids below the surface
- Attach the airlock lid – don’t overtighten
- Leave at room temperature – out of direct sunlight
Within a day or two, you’ll usually see bubbles or activity.
After that, it’s mostly about letting it do its thing.
Common Mistakes (And Easy Fixes)
Food Floating Above the Brine
This is one of the most common issues.
Fix: use a weight properly and remove loose pieces
Forgetting the Airlock Water
If you’re using a water airlock, it can evaporate.
Fix: check it occasionally and top it up
Using the Wrong Materials
Regular metal can rust and affect flavour.
Stick with glass, ceramic, stainless steel or plastic.
Not Cleaning Properly
Residue can affect future batches.
Rinse and dry everything between uses
Choosing the Right Setup (Keep It Simple)
You don’t need anything complicated here.
What matters most:
- a weight that fits your jar properly
- a simple airlock that seals well
- materials that are easy to clean
Once those are in place, the process becomes much easier to repeat.
A Simple Setup That Covers Everything
If you want to keep things really simple, a basic fermentation kit with a jar, airlock lid, and weight covers everything you need to get started.
This is what made the biggest difference for me early on — having everything set up properly from the start instead of trying to piece things together.
32 oz kit (for smaller batches)
64 oz kit(general use)
1 Gallon kit (larger batches)
Improvising When You’re Starting Out
If you don’t have proper equipment yet, you can still get started.
Things that can work:
- a small jar used as a weight
- a resealable bag filled with brine
- a loose lid to allow gas to escape
That’s how I started.
But over time, I found that proper tools made everything more consistent and removed a lot of the guesswork.
What Changed Once I Used These Properly
The biggest differences I noticed:
- fewer issues with mold
- better texture (especially crunch in vegetables)
- more consistent results
- less checking and adjusting
It doesn’t make fermentation complicated — it actually makes it simpler.
Ferments That Benefit Most
These tools make the biggest difference when you’re fermenting:
- Sauerkraut
- Kimchi
- Pickles
- Carrots and other vegetables
- Hot sauces
Anything that sits in brine for more than a few days benefits from a low-oxygen, stable environment.
Where to Go Next
If you’re building your fermentation skills, these will help:
How to Identify Contamination in Fermented Foods (important for avoiding mistakes)
Beginner’s Guide to Fermentation (start here if you’re new)
Salt Ratios for Fermentation (this is what controls your results)
These go deeper into getting consistent results and avoiding the mistakes that usually cause problems early on.
Final Thoughts
Using weights and airlocks isn’t about making fermentation more complicated — it’s about removing the small problems that cause most batches to fail.
Once you’ve got a simple setup that works, everything becomes more predictable.
And that’s when fermentation really starts to become enjoyable.